Taste the Rainbow Cake

For my daughter’s birthday, by special request, I made a rainbow cake.  It turned out really well.  I followed the directions I found over on this blog:

how to make a rainbow cake!


I didn’t use the diet recipe because my 6 year old isn’t on a diet but that recipe does look super simple.  Smile  I just followed the standard directions on the box mix I used. 

100_0008

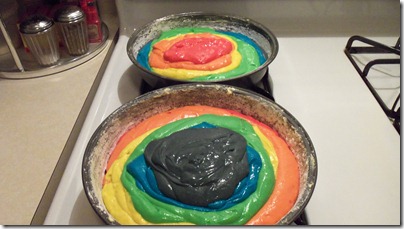
Mixing the colors was fun.  Finding enough bowls to mix them in was a pain!  LOL  I didn’t mix the basic cake mix much at all, just a rough mix, since I knew the batter was going to get a longer mixing once I added in the colors.  Then I divided into 6 roughly equal portions.  I ended up with about 1 and 1/3 c. of batter per color.  I used about 24 “dots” of gel for each color as well.  The orange and purple you have to design yourself but I found that about a 3-1 ratio of yellow to red made a good orange, and the same for blue to red made a decent purple.

100_0011

I followed the recipe creator’s instruction to use a greater amount of the bottom colors first, and also to reverse them in the pans.

100_0013

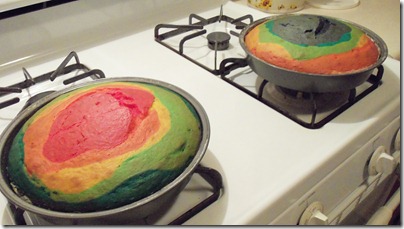
I needed to bake mine a little longer than the box called for (about 5-8 min), probably because I was using 2 boxes of cake mix, like the recipe called for.  My cakes seemed more brown than the creator’s did, but I also used the egg whites and oil in mine so that may account for some of that golden color too.

100_0025

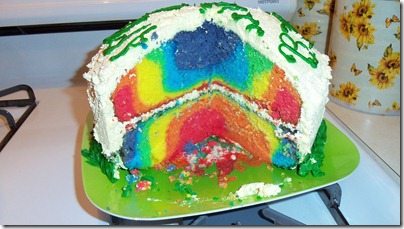
Once it was done though, and we cut into it, the vibrancy of the colors really came through! 

100_0026

The pudding/Cool Whip frosting mix tasted really good but it was just a tad sticky to work with.  I recommend pushing the frosting.  It’s a technique I was taught many years ago.  You put a big glob of frosting on the middle of your cake and then spread it by gently pushing small areas of the glob away from the center rather than adding small globs a little at a time and pulling them toward you.  Don’t try to “smear” the frosting or you’ll tear your cake.

Also, I opted to simply invert my bottom layer when I assembled it, rather than slicing some off to make it level. 

It was so much easier than I thought it would be, the hardest part really was just mixing the colors over and over because that got a little old and repetitious because I did it by hand but otherwise, it was lots of fun, and the “ooh!” factor from my kids was the best part.  Open-mouthed smile

Okay, I “oohed!” too.  Winking smile

from DF with love 🙂

Cross-posted at Nessipes 

Cheesecake


From my Grandmother’s hand-written files.


Ingredients For filling:

  • 3 or 4 eggs
  • 2 packages Philadelphia Cream Cheese (or similar)
  • 1/2 cup sugar
  • 1 TSP. vanilla

Ingredients For Crust:

  • crushed graham crackers

Ingredients for Topping:

  • 1/2 pint sour cream (8 oz.)
  • 2 TSP. sugar
  • 1 TSP. vanilla

Directions:

  • Preheat oven to 350°
  • Put the eggs, cream cheese, sugar & vanilla in large mixing bowl.
  • Beat ingredients with egg beater until smooth.
  • Make the crust by lining a greased pie pan with crushed graham crackers.
  • Pour in mixture and bake for 20 minutes.
  • Remove from oven. Increase oven to 400°.
  • Mix together the sour cream, sugar and vanilla for the topping and spread on top of baked filling.
  • Return pie to the oven and bake 5 more minutes.
  • Remove from oven and cool on wire rack.

posted by Mountain Republic                              recipe by Amy Chenevert

Top Hat Soufflé

A soufflé is a light baked cake made with egg yolks and beaten egg whites combined with various other ingredients and served as a savory main dish or sweetened as a dessert. The word soufflé is the past participle of the French verb souffler which means “to blow up” or more loosely “puff up”—an apt description of what happens to this combination of custard and egg whites.

Ingredients:

  • 1/4 cup butter or margarine (1/2 stick)
  • 1/2 cup flour
  • 2 cups yellow cream style corn
  • 1/3 cup milk
  • 1/4 TSP. salt
  • 1/8 TSP. garlic salt
  • 1/2 TSP. Worcestershire sauce
  • 1-1/2 cups shredded Cheddar cheese
  • 1/2 cup shredded Provolone cheese
  • 5 large egg yolks, slightly beaten
  • 5 large egg whites, stiffly beaten

Directions:

  • Preheat oven to 350°
  • In a heavy saucepan, melt the butter and blend in flour until smooth.
  • Add corn, milk, salt, garlic salt and Worcestershire sauce and cook, stirring constantly until thickened.
  • Add both cheeses and stir until melted.
  • Blend egg yolks into sauce.
  • Cool slightly.
  • Gently stir 1/4 of egg whites into cheese sauce.
  • Carefully fold remaining egg whites into sauce until just blended.
  • Pour into ungreased 2 quart casserole dish.
  • Bake at 350° for 45 – 50 minutes.

posted by Mountain Republic                                        recipe by unknown

contains content from: Wikipedia

Ohio Shaker Lemon Pie

image

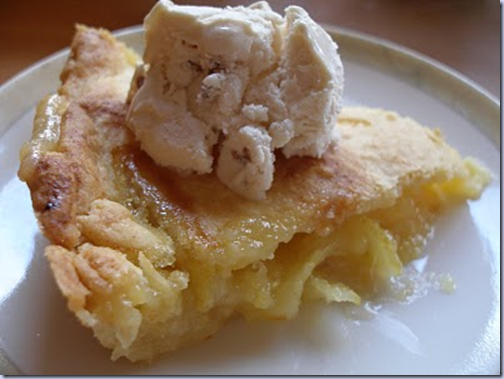
I found this recipe when I was looking for a post for my personal blog.  I received a few requests for the recipe, so here it is.  Smile  Doesn’t it look delicious?  I can’t vouch for it personally … yet.  Give me time though!  If you decide to make it, please leave a comment and let me know what you think!

Here’s where I found the recipe and picture:
Bounteous bites: Ohio Shaker lemon pie: A whole lot of lemon and a little bit more.

Ohio Shaker lemon pie
(adapted from
Epicurious)
300-400 g pâte brisée (a fancy way of saying pie dough; the Epicurious link above has a recipe for that)
2 lemons
4 dl sugar (1 ¾ cups)
4 big eggs
1/4 tsp salt

  1. Blanch the lemons for 30 seconds in a large saucepan of boiling water, then drain them and rinse under cold water.
  2. Cut off the ends of the lemons, discarding them and then cut the lemons cross-wise into paper-thin slices (I used an electrical slicer, but a lot of patience and a sharp knife can complete the mission, too). Remove the seeds.
  3. Put the lemon slices into a bowl, trying to collect all the juice that has flown out of them. Cover with sugar and let the mixture stand for one whole day, stirring after the 1st hour.
  4. Next day roll out half the dough on a lightly floured surface and fit it into a 22-24 cm (8-9 in) pie plate, leaving an overhang.
  5. Remove the lemon slices from the liquid that has formed to the bowl and arrange them in the pie shell.
  6. Add the eggs and salt to the sugar, whisk until combined well and pour the mixture over the lemon slices.
  7. Roll out the remaining dough so that it would also leave an overhang. Cover the pie with it and fold the overhang under the bottom crust, pressing the edge to seal it.
  8. Cut slits in the crust with a sharp knife, forming steam vents, and bake for 35 minutes in the middle of the oven at 220C (425°F).
  9. Reduce temperature to 175C (350°F) and bake for 20-25 minutes more, or until the crust is golden.
  10. Let the pie cool and serve it at room temperature. I’d definitely say a heap of ice cream is a must!

Fruit Fondant Candies

“Fondant” candy is made from a thick, creamy sugar paste. Fondant is also one of several kinds of icing-like substances that are used to decorate cakes and sculpt pastries. In French, the word fondant means “melting”. These candies will definitely melt in your mouth!

Ingredients and Preparation:

  • 1/4 cup mashed potatoes
  • 1 TSP. butter
  • few grains of salt
  • 2 cups sifted powdered sugar
  • 1/2 cup coconut
  • 1/2 cup nuts
  • 1/2 cup candied fruit
  • food coloring* (optional)

Mix the mashed potatoes, butter and salt. Stir in the powdered sugar and beat well.

Fold in the coconut, nuts and candied fruit. Drop by spoonfuls onto waxed paper.

*Tip from DF: A few drops of food coloring can be added so the candies match a theme or holiday.

posted by Mountain Republic                                    recipe by Vida Slater


Lemon Sponge Cake

A nice & light Lemon Sponge Cake from one of my Grandmother’s handwritten recipes. This one really couldn’t be any quicker or any easier.  Here we go:

Ingredients and Preparation:

  • 1 package Duncan Hines “Lemon Supreme” Cake Mix
  • 1 cup water
  • 1/2 cup vegetable oil
  • 1 package Jello Instant Lemon Pudding Mix
  • 4 eggs

Disregard directions on the cake mix box. Combine all ingredients in a bowl and beat well with electric mixer. Pour mixture into well greased tube pan.

Bake 55 minutes at 350°. Let cool. Remove from pan to finish cooling.

posted by Mountain Republic                                        recipe by Ruth Hagen

Date and Nut Loaf

I recently ran across this old date and nut loaf recipe. It produces a very delicious, extra moist date bread that I just haven’t been able to get enough of lately. I’ve made it several times in the last couple of weeks. It’s just so darn good!

Did you know that dates are really good for you? I guess my Grandmother did, because I remember that she often made this recipe. Besides being very high in both fiber and potassium, dates are also extremely rich in anti-oxidants.

This date bread smells really good when it’s cooking (I’ve got one in the oven right now!) but it tastes even better!

Did I mention that this recipe is quick and easy? Hope you enjoy. Here we go:

Date and Nut Loaf

Ingredients & Preparation:

  • Pour: 1 – 1/2 cups water boiling water over 1 – 1/2 cups chopped dates (1 – 8 oz. package) Stir lightly. Let cool
  • Mix together in a bowl: 1/2 cup brown sugar (packed), 1 TBSP.  soft shortening, 1 egg
  • Stir in: the dates and water
  • Sift together and stir in: 2 – 1/4 cups sifted flour, 1 TSP. baking soda, 1/2 TSP. salt
  • Blend in: 1 cup broken walnuts
  • Pour: into a well greased 9″ x 5″ x 3″ loaf pan. Let stand 20 minutes.
  • Bake: at 350° for 60 – 70 minutes. A toothpick stuck in center should come out clean

posted by Mountain Republic

Banana Walnut Bread

I do most of my baking during the cooler months of the year & quick breads are one of my favorites things to bake.

Quick breads are made with quick acting leavening like baking powder, soda, sour milk or steam, instead of the slower rising yeast.

Many different kinds of breads, muffins, biscuits and corn breads fall into the “quick breads” category, including pancakes, waffles, dumplings & doughnuts.

Today’s “quick & easy recipe” is for Banana Walnut Bread. Ready? Here we go:

INGREDIENTS:

  • 3 cups sifted flour
  • 3-1/2 TSP. baking powder
  • 1 TSP. salt (Kosher if you have it)
  • 1 cup sugar
  • 2 TBSP. shortening
  • 3/4 cup milk
  • 2 overly ripe mashed bananas
  • 1 egg
  • 3/4 cup chopped walnuts

PREPARATION:

  • Preheat oven to 350°.
  • Cream the sugar & shortening together.
  • Stir in the egg, milk & mashed bananas. Mix well.
  • Sift together & stir in the flour, baking powder & salt.
  • Add the chopped nuts to the mixture & stir.
  • Pour into a well greased 9″ x 5″ x 3″ loaf pan.
  • Dust the top with cinnamon or nutmeg (optional)
  • Let it stand for 20 minutes or so before baking.
  • Bake for about 70 minutes or until golden brown.
  • When done, a toothpick inserted in center will come out clean.
  • Let cool in pan for 5 minutes, then remove loaf & finish cooling on a wire rack. The loaf will have a “crack” on the top. This is normal.

Here’s a look at the finished product

The loaf will be easier to slice when allowed to fully cool, but who can wait that long?

posted by Mountain Republic

Related Articles:

Christmas Salad

This hand-written recipe from my Mom was dated Xmas 1952. I remember that my Aunt loved this Christmas Salad recipe & she always served it at her Christmas dinners. On the lower corner of the index card, my Mom scribbled the word “delish!” Hope you enjoy.

Merry Christmas to all from Mountain Republic!

Christmas Salad

INGREDIENTS:

  • 1 box Lime Jello
  • 1 box Cherry Jello
  • 1 can crushed pineapple
  • 1 jar Bing salad cherries, pitted
  • 1 cup chopped nuts (if desired)
  • whipped cream or Cool Whip etc.
  • red or green Maraschino cherries

PREPARATION:

  • Prepare Lime Jello according to directions on package, except use the pineapple juice in place of part of the water.
  • Add the pineapple (& nuts if desired) to the Lime Jello.
  • Prepare Cherry Jello according to directions on package, except use the Bing cherry juice in place of part of the water.
  • Add the pitted Bing cherries to the Cherry Jello.
  • Mold in separate layers. Chill.
  • Top with whipped cream.
  • Garnish with green or red Maraschino cherry.

posted by Mountain Republic


Related Articles:

Mo’s Plum Pudding

Like SamHenry, my maternal Grandmother was also from Britain. She was born in Edinburgh, Scotland in 1885 and moved to London where she resided until the end of World War 1.

At the end of  the “war to end all wars”, she married my Grandfather and moved to the United States, bringing along her recipe box filled with instructions for preparing traditional English fare.

Every Christmas my Grandmother would spend days & days in the kitchen, baking cookies, fruit cakes & plum pudding as gifts for her family and friends.

Plum pudding was traditionally made in a “bag” & hung for weeks prior to Christmas to enhance the flavor. By the time I came on the scene, my Grandmother had adopted the pudding can* since she liked to make several small puddings to give away as presents.

You can’t get much more traditional English fare at the Christmas holiday than than a good plum pudding.


Mo’s Plum Pudding

INGREDIENTS:

  • 3 cups sifted flour
  • 1 TSP. baking powder
  • 1 TSP. salt
  • 1 TSP. cloves
  • 1 TSP. all spice
  • 1 TSP. nutmeg
  • 2 TSP. cinnamon
  • 1/2 TSP. ginger
  • 1 package brown sugar
  • 1 # chopped beef (suet)
  • 1 package currants
  • 2 # seedless grapes
  • 1 package seeded raisins
  • 1 # chopped, mixed peel
  • slivered almonds, blanched
  • 6 beaten eggs
  • 1 can apple sauce
  • 1 TSP. molasses
  • 1 TSP. almond extract, grated lemon rinds or essence of lemon
  • 1 cup of broth. Can be water, cider or fruit juice

PREPARATION:

  • Mix all ingredients together
  • Grease bottoms and sides of pudding cans*
  • Put wax paper in bottom of cans
  • Fill cans with mixture and cover top with wax paper
  • Steam for about 6 hours or more in roasting pan, with water halfway up side of cans
  • Add boiling water about every hour
  • Remove from water, place on rack and leave covers off cans overnight

*Don’t have any “pudding cans”? Wash & save a few empty soup cans from your kitchen. Recycle – that’s what your Grandma did!

posted by Mountain Republic                                 recipe by Amy Chenevert